Cost:
$25k
Time:
Weeks to Months
Skill:
Expert
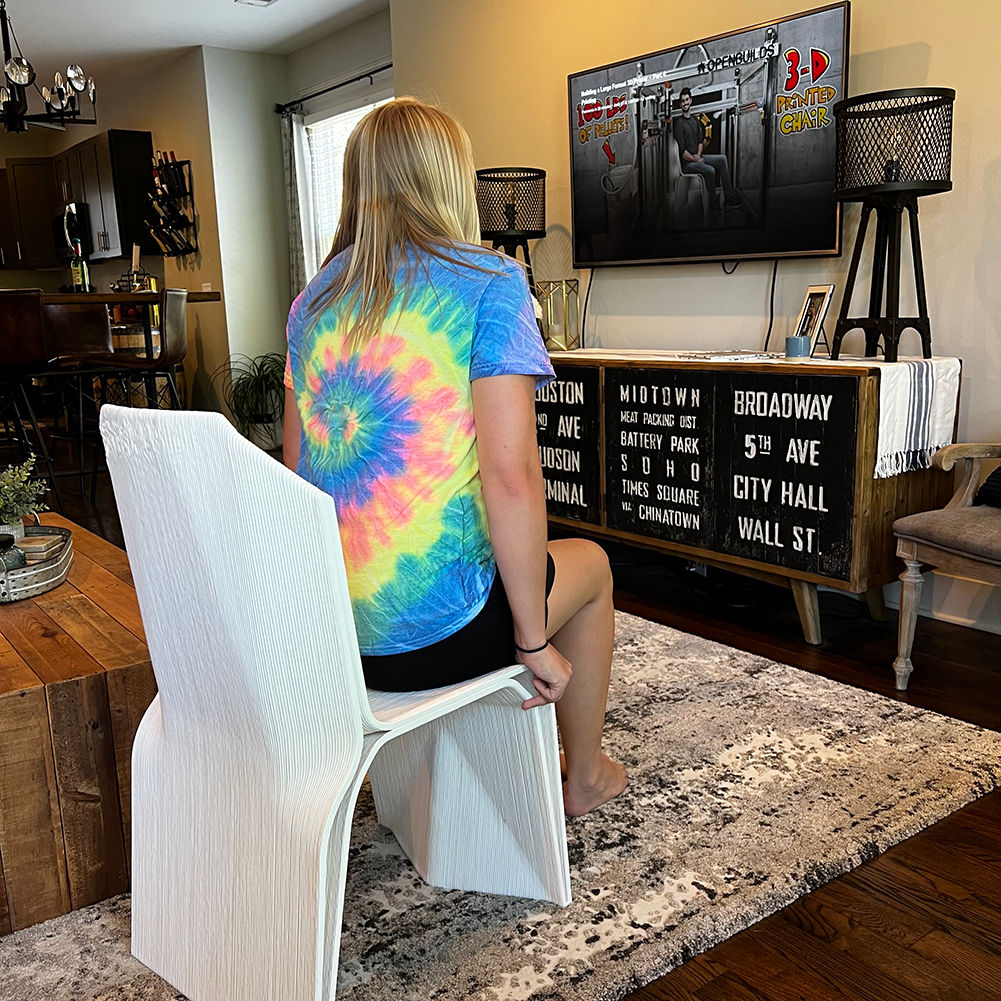
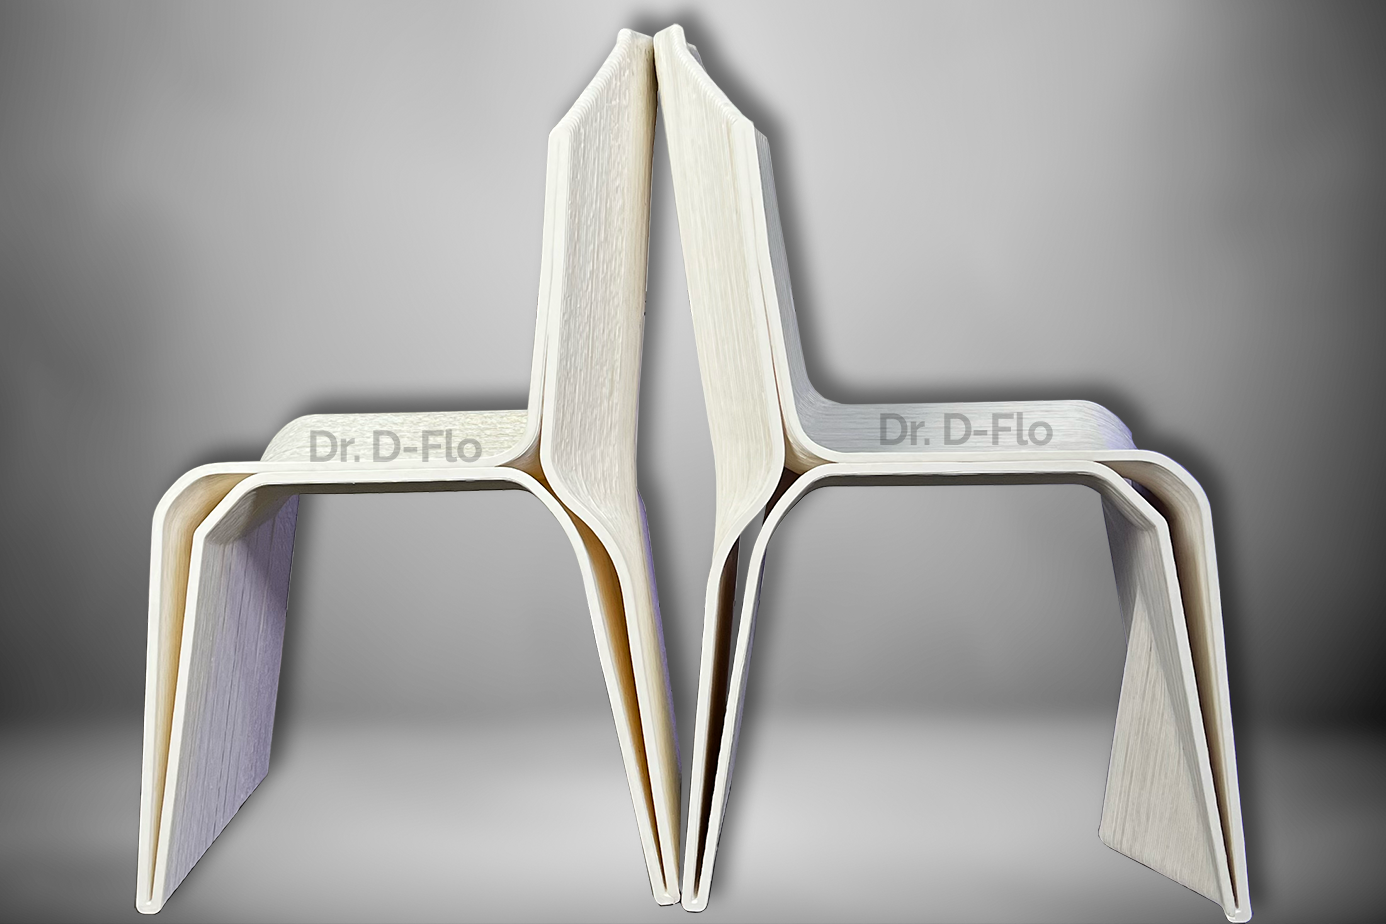
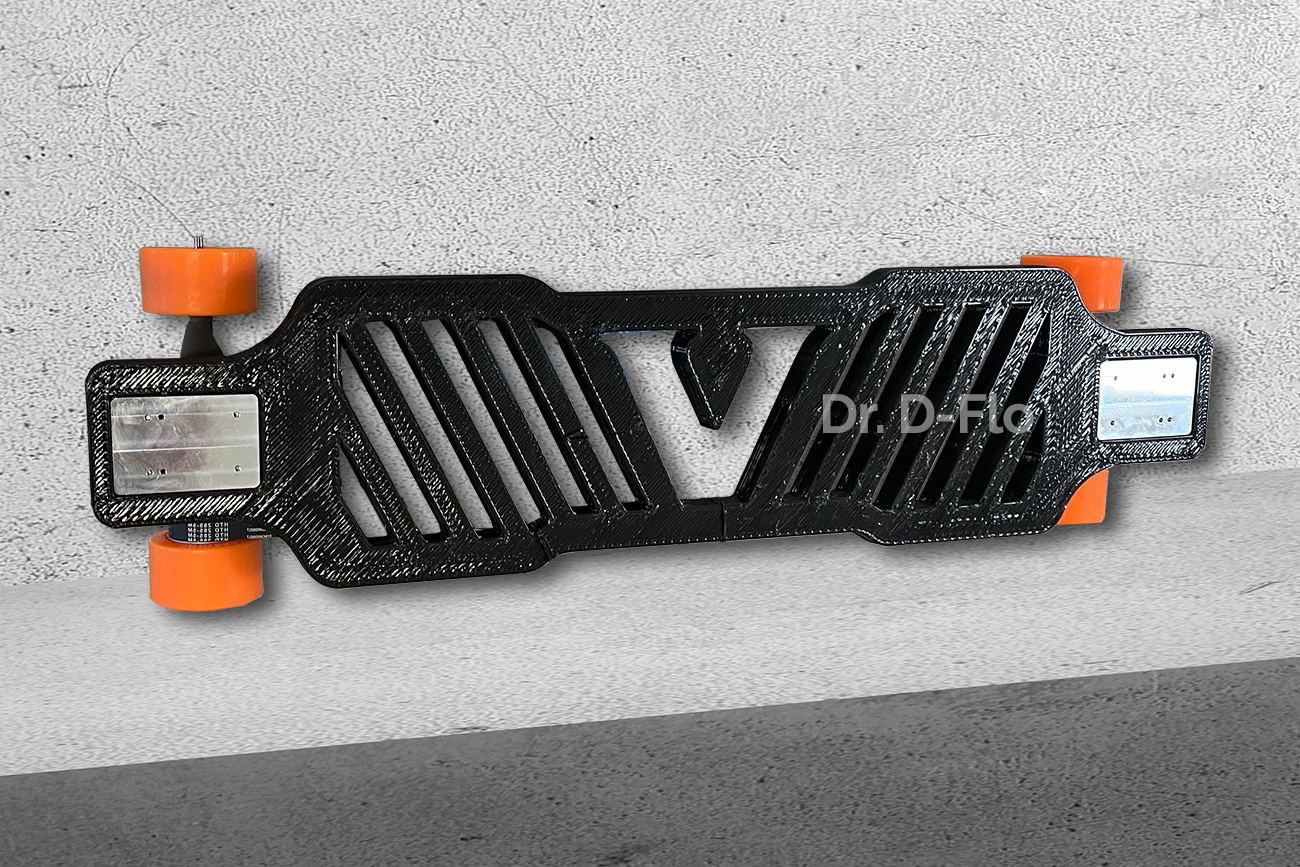
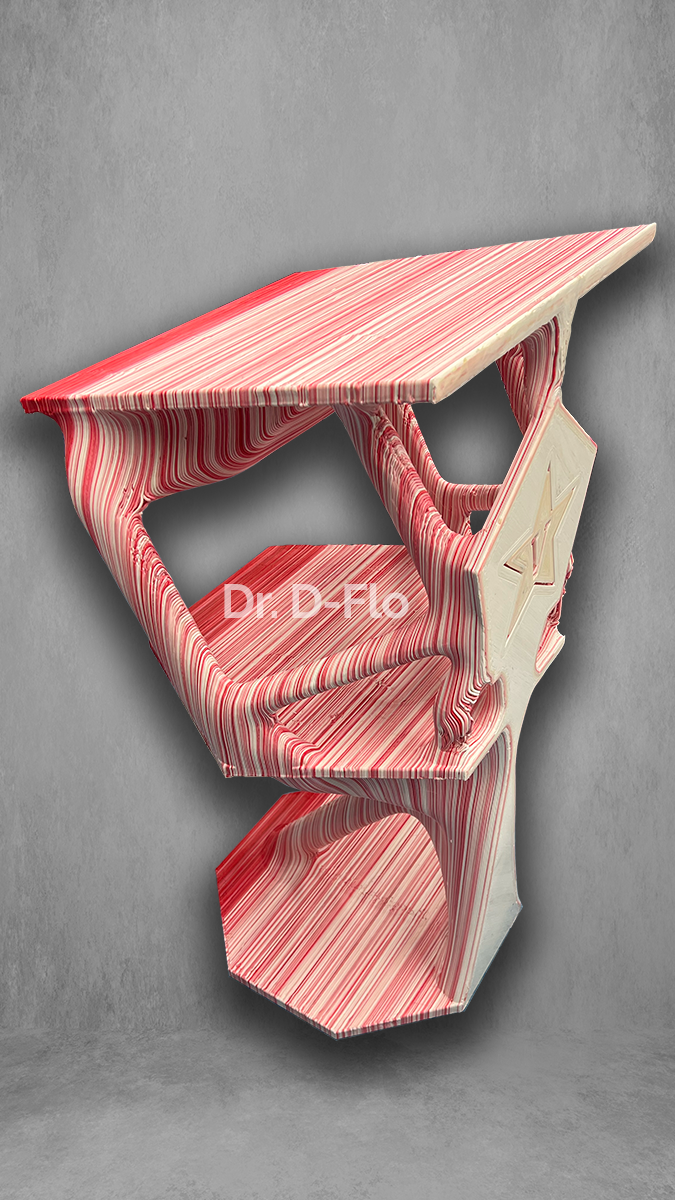
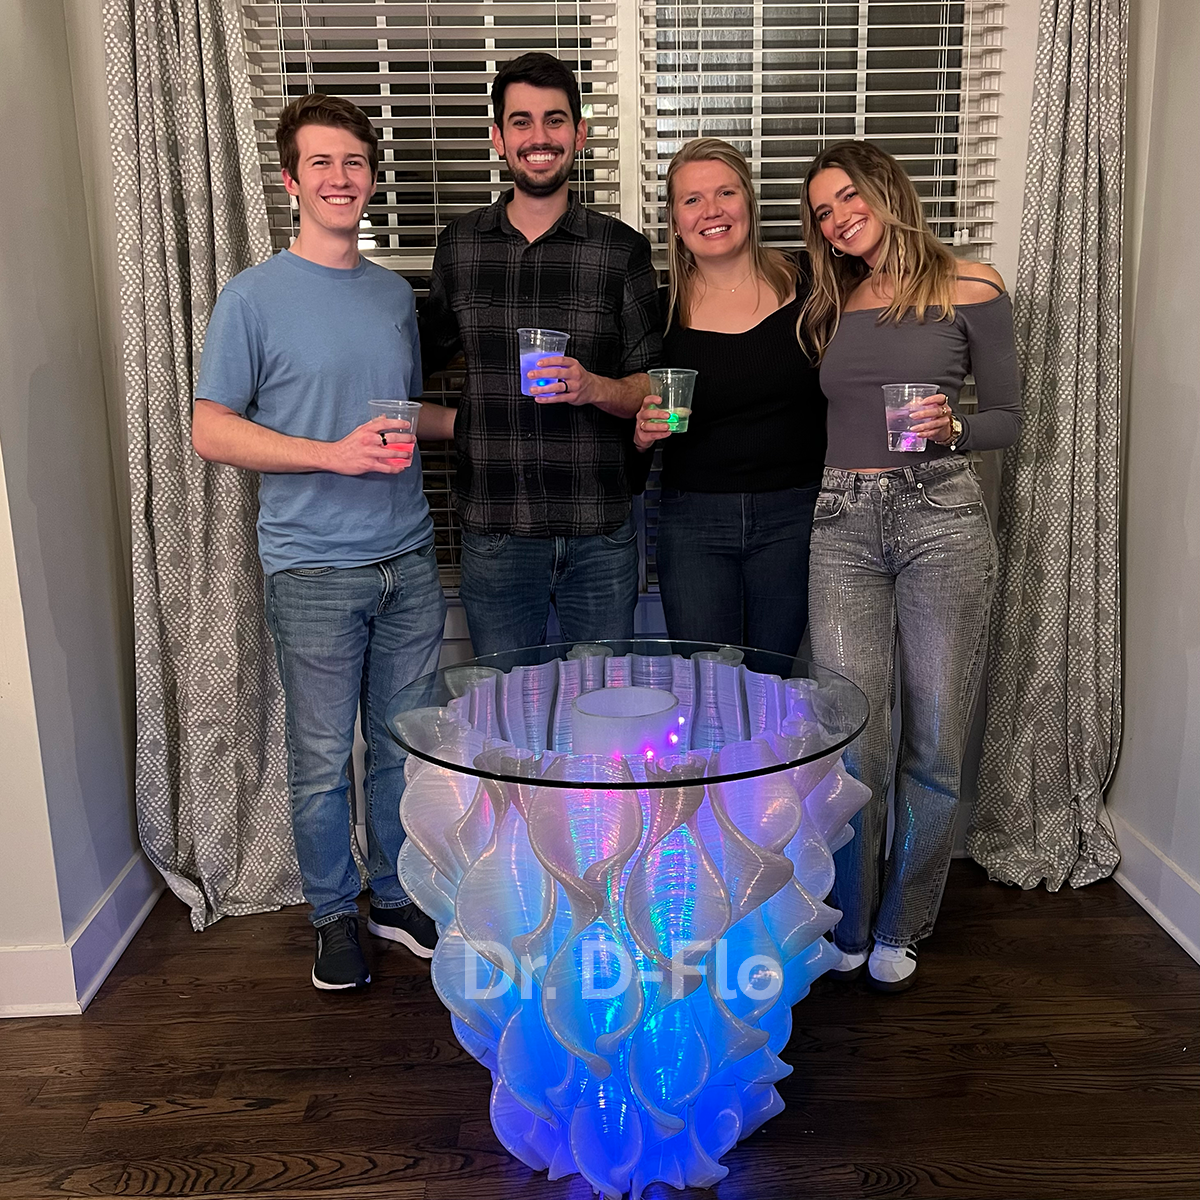
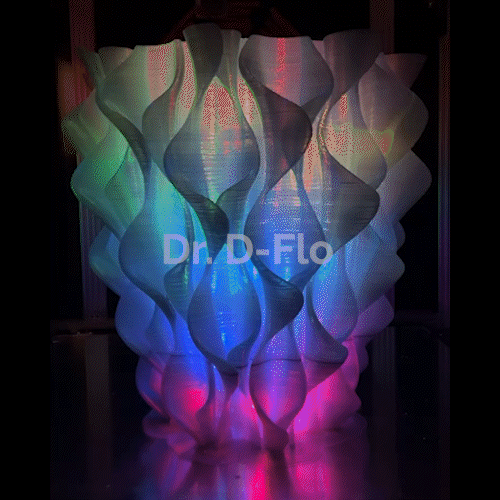
Featured Prints
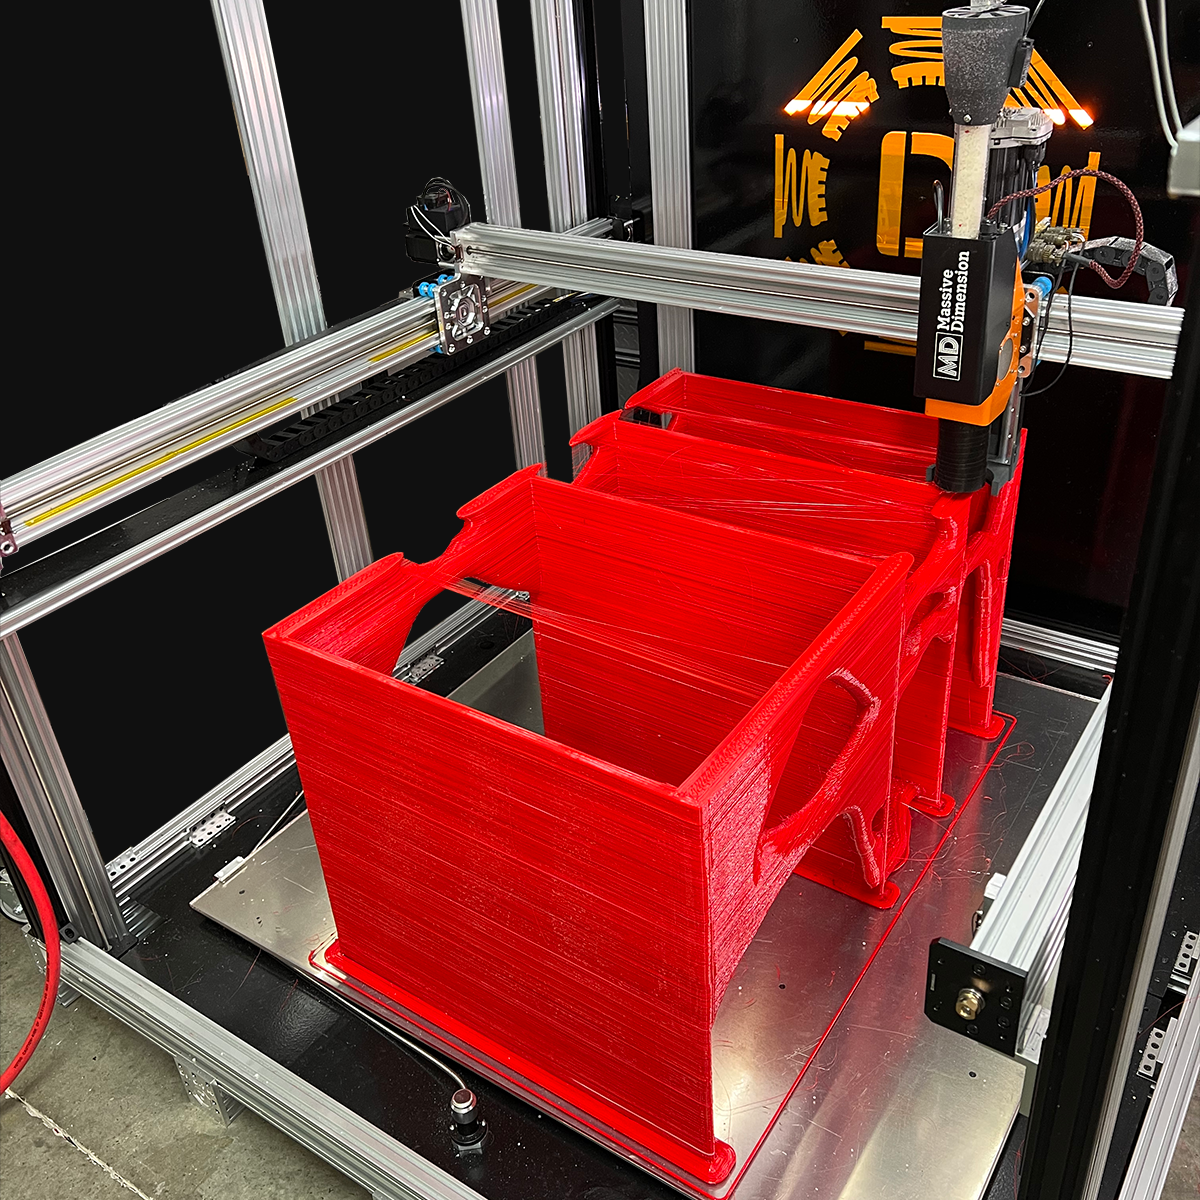
Take a look at what is possible with a large format 3D printer: from intricate models to functional structures.
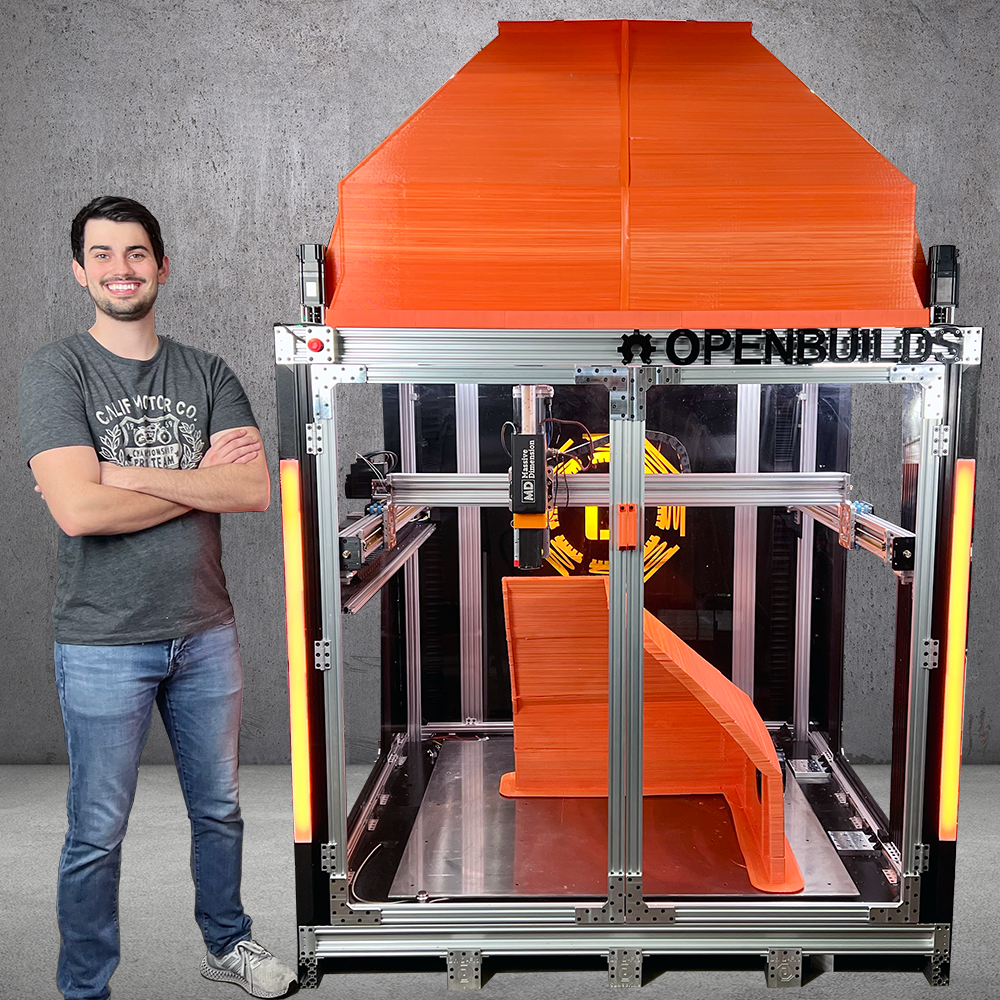
Project Overview
Welcome, to the project page of one of the largest DIY 3D printers! Here you will find the BOM, CAD model, wiring diagrams, printing parameters, and other particulars that did not make it into the YouTube series. Please note that this information supplements but does not replace the build series, so definitely watch the videos. For questions, comments, and to share your build, please post to the forum.
SAFETY DISCLAIMER: This is a dangerous build that draws close to 8 kW when heating up to temperatures >300°C. Poor electrical wiring may lead to a fire and/or electrocution. If the printer is enclosed, then there is a possibility that a person could become trapped inside of the heated chamber. Electrical and safety codes of your municipality should be adhered to. Dr. D-Flo is not responsible for any damages, loses, or injuries because of any individual attempting this project or operating the printer. Experience with building 3D printers, electrical mains wiring, and overall, mechanical knowhow are musts.
License: This project is licensed under BY-NC-SA 4.0. Users are allowed to adapt and remix the work but all contributions must be distributed under the same license as the original (e.g., noncommerical). The base 3D model cannot be redistributed, but modifications that unlock new features or significantly improve the base function of the printer can be shared. For any questions on this license please contact Dr. D-Flo.
Versions

Custom carriages for the Rack and Pinion found in the LF3DPγ Version
This is an ever evolving and improving project. Below are the different versions of the Large Format 3D Printer (LF3DP). The later versions will be more capable, but also more expensive. Most of the mechanical components (e.g., frame, bed, and gantry) are preserved between versions. This is a DIY project, so feel free to mix and match versions depending on budget and requirements.
LF3DPα – The Alpha version uses a standard Tr8*8-2p lead screw with open-loop (i.e., normal) stepper motors. The end stops are mechanical switches, and all electrical components are wired directly to the mainboard (versus CAN BUS). The Alpha version is seen in videos 1-4. A complete 3D model is available for the alpha version.
LF3DPβ – The beta version upgrades the stepper motors to closed-loop motors on all axes and electromagnetic brakes are used on the Z-axis. Duet 3 1HCL tool boards are used for each motor to minimize wiring through CAN-FD BUS connections to the Duet 3 Mainboard. The Beta version is seen in video 5. Configuration files are available for the Beta version, but the CAD file is largely the same as the alpha.
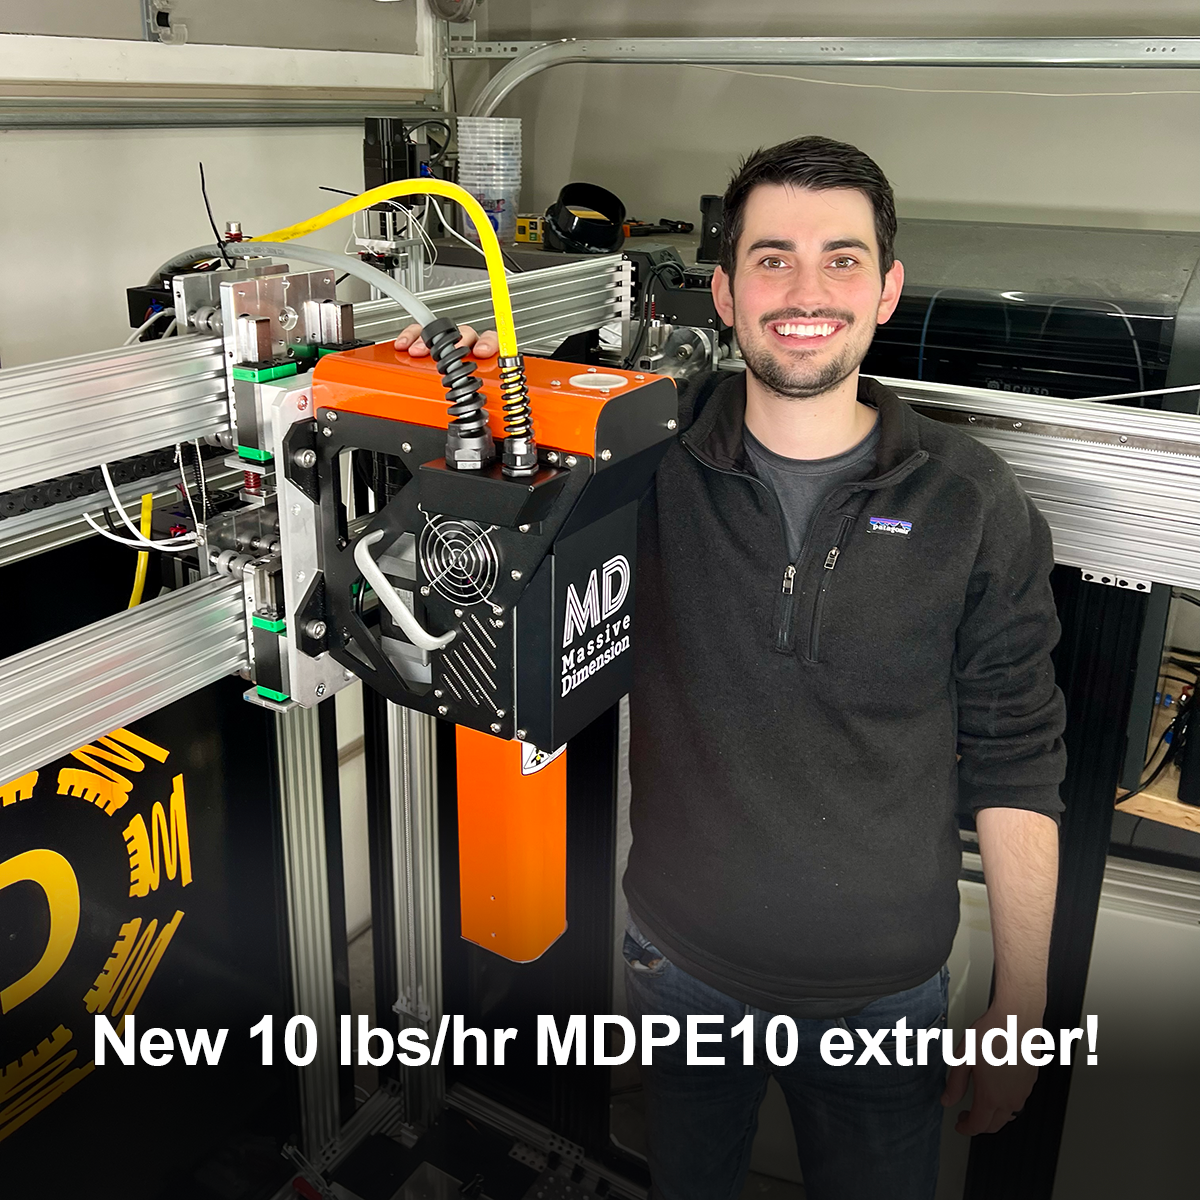
LF3DPγ – As seen in video 6, the lead screws have been swapped out for 1604 ball screws on the Z-axes and custom rack and pinion (R&P) actuators on the X and Y. This upgrade allows for 3x the max print speed in the X and Y (up to 180 mm/s) and more reliable motion in the Z. This version also features the new MDPE10 extruder (see Extruders section below)! While superior in almost every metric, the LF3DPγ moves away from off-the-shelf parts from OpenBuilds and relies heavily on custom machined components for the new actuators. For this reason, the LF3DPγ is expensive and more difficult to DIY. If you are interested in this version, please reach out to Dr. D-Flo as the CAD files are not open-source at this time.
Features
All the benefits of a hobbyist 3D printers scaled up significantly! Upload a model, click print, and create. Manufacturing of largescale prototypes has never been so easy.
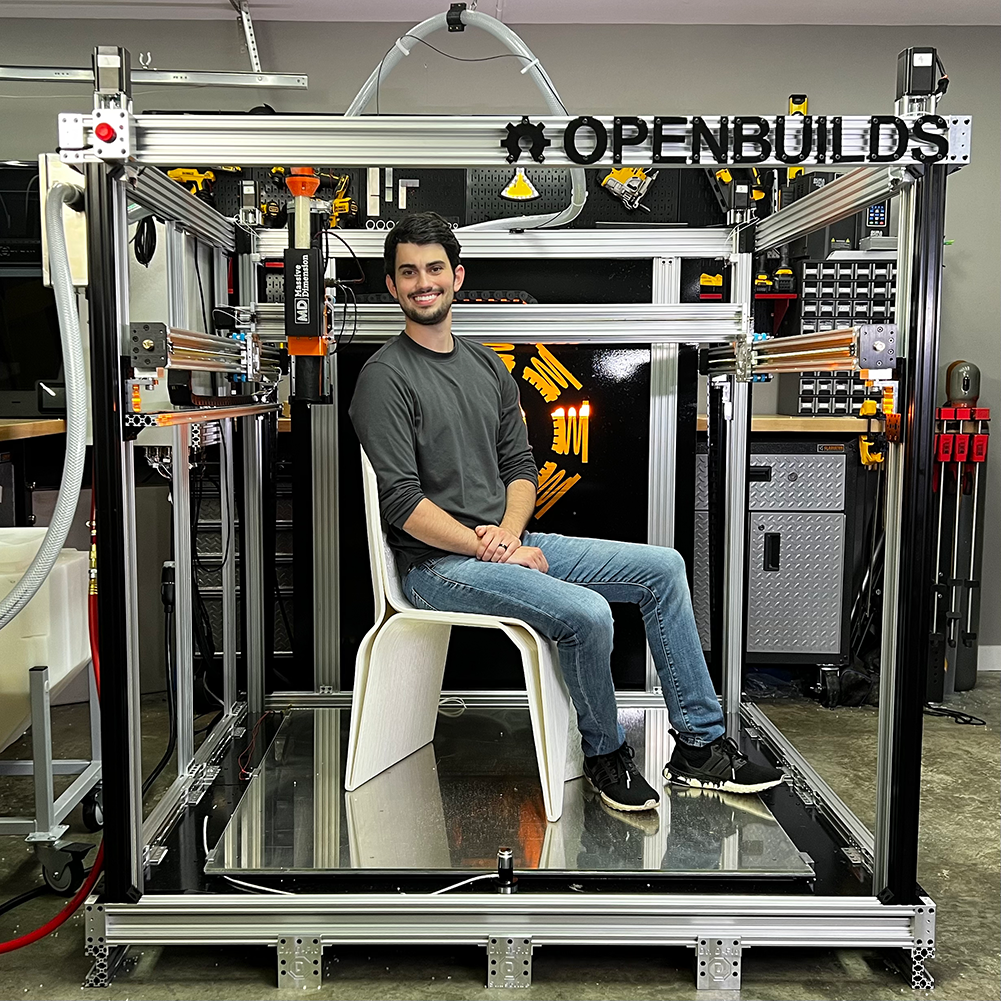
- Massive Print Area: 1120 x 1120 x 1100 mm
- With a build envelop just shy of 4 feet in all dimensions, the LF3DP is capable of printing furniture and other large objects.
- High Volumetric Output Extruder: 1 kg/hr - 450℃
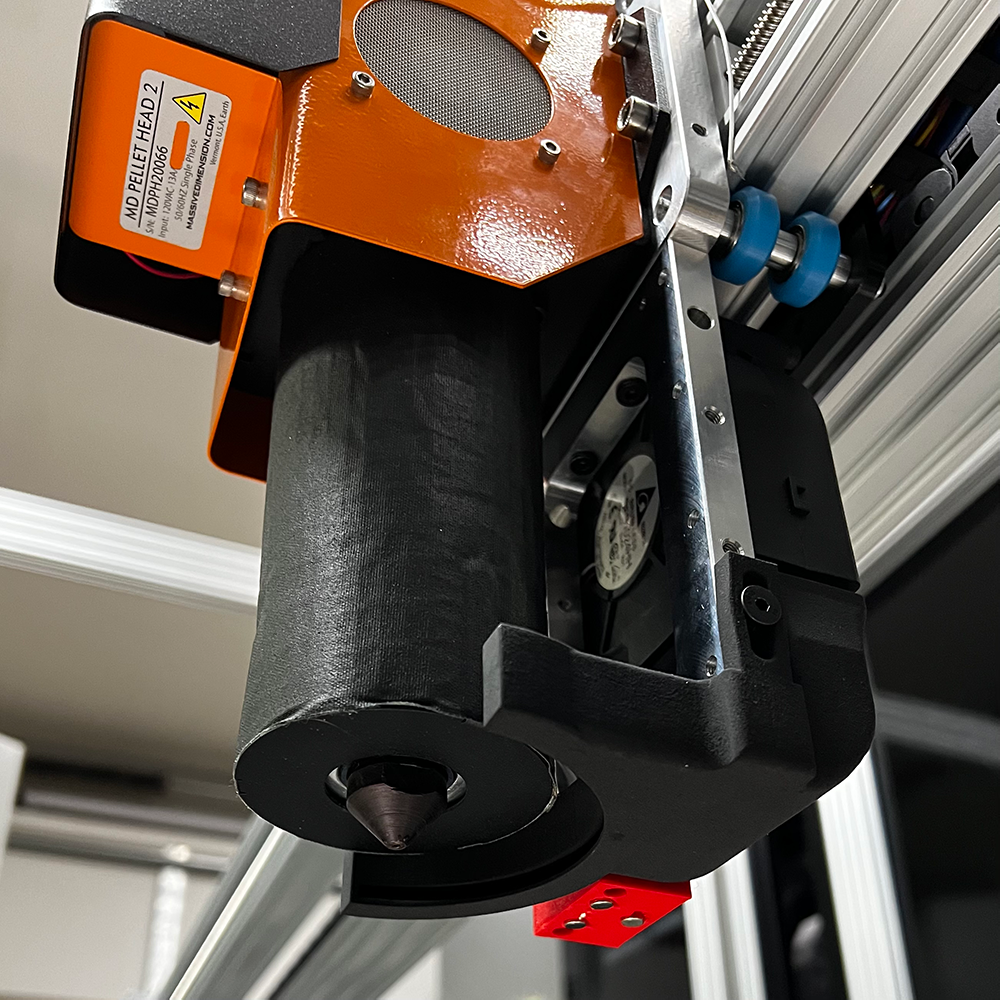
- This printer comes standard with a MDPH2 extruder by Massive Dimension, which can extrude at a rate of 1 kg/hr. Unlike typical filament extruders, the MDPH2 uses a screw to convey and liquify plastic pellets before the molten material is pushed out of a large nozzle (1 to 5 mm extrusion diameter). Please note: This printer can also be configured for other high flow rate extruders, such as the Typhoon and Pulsar by Dyze Design.
- Affordable Pellet Feedstock
- Pellets are the cheapest form of feedstock for any plastic-based manufacturing process. Save 50-75% of material costs by using pellets instead of spools of filament. Concentrated colorant can be added to the virgin material to achieve any color in the rainbow without requiring large amounts of storage. Recyled material can also be used for sustainable material printing.
- Powerful Heated Bed: 5500W - 150℃
- Most pellet extruder-based 3D printers or robotic arms require clamps and other forms of mechanical fixation to prevent large parts from warping and being dislodged from the print envelope. The LF3DP uses a 5500 W heated bed to keep the initial layers from cooling too quickly and lifting off the print bed. The ultra-smooth borosilicate glass plate provides an even printing surface, which can be augmented with PEI tape or your favorite bed coating for more difficult to print plastics.
- Automatic Gantry Leveling
- Inspired by the quad gantry leveling system of smaller CoreXY 3D printers, such as the Voron 2.4, the LF3DP uses a probe and 4 independently driven Z actuators to automatically square the gantry to the glass build plate. The result is a consistent nozzle distance (< 0.5 mm of deviation) for an even first layer.
- Compact and Enclosed Form factor: 1600 mm x 1600 mm x 1800 mm
- The enclosure is only 30% larger than the print bed, creating a small footprint for a printer capable of such massive prints. The enclosed build volume and high-powered bed heater allows polymers, such as ABS and Nylon to be printed.
- Familiar Software: SuperSlicer
- Import the LF3DP configuration files into or use your favorite slicer to create printable files. Upload the G-code to the LF3DP’s Duet web interface.
Limitations
Anyone who has owned a hobbyist 3D printer has wished at least once that their bed size was bigger. However, going from the standard 250 x 250 mm build plate to one 5x larger in both X and Y comes with a premium price tag and some limitations that you may not have anticipated. Please consider carefully if large format 3D printing is right for you and your business by reviewing the limitations below.
A spectacular explosion of plastic after the X-axis actuator failed.
- Travel Speeds
- The LF3DPα tops out at 60 mm/s (3600 mm/min or 140 ipm) print/travel speed. A lead screw transmission was chosen due to its ability to accurately move the heavy MDPH2 print head, which weighs 11.3 kg or 25 lbs when summing the weights of the extruder, full pellet reservoir, and aluminum carriage. However, the tradeoff for using a Tr8*8-2p lead screw is its low max speed. The LF3DPγ uses racks and pinions to increase the max print speed to 180 mm/s.
- Cost of Print Failures
- This limitation is inherent to all large format printers but print failures at this scale can be both expensive and damaging to the printer. Warping and blobs of extra plastic can cause the extruder to collide with the printed part. Typically, the heated bed and careful tuning of print settings mitigate these potential collisions, but LF3DPβ version uses closed loop stepper motors to detect misstep steps and pause the printer to avoid wasted plastic.
- 3D Model Optimization (No Supports)
- 3D models that print well on a normal filament printer may print poorly or not at all with a pellet extrusion-based system. To have a high volumetric flow rate, pellet extruders have a large hold up of molten polymer, which oozes during non-printing movements. Carefully tuning the coasting parameter (i.e., prematurely stopping the extrusion before a non-print move) can eliminate most of this oozing and resulting stringing, but it is best practice to create models that can be printed continuously.
- The other issue with pellet extruders and printing large extrusions widths is that the polymer will integrate tightly with the previous layer because the thick extruded fiber has a high thermal mass. This is great for the mechanical strength of the part, but bad for support material removal. Consequently, support material printed with a pellet head will require destructive methods to remove it (sawing, hammering, grinding, etc.), which often damages the part. Designers should look to remove overhangs from their model. It should be noted that pellet extruders are capable of some amount of bridging as seen when printing the step stool in video 4, but this requires slow print speeds and a high CFM part cooling fan.
- High Temperature Prints
- One of the original goals with this printer design was extrusion and subsequent printing of performance plastics. This includes materials such as PEEK and PEI, which have high melting points. The MDPH2 extruder has a maximum temperature of 450 ℃, which is perfect for these plastics. However, a mixture of technical and financial limitations has thus far prevented the printing of these plastics. The high chamber temperature needed to prevent warping would require heating coils, which would draw even more amperage, and thick insulation would be needed to trap the heat in. The X-axis stepper motor and servo motor on top of the extrusion head would have to be water cooled to prevent their insulation from melting. But perhaps, the biggest challenge would be keeping the throat of the extruder cool enough, so that pellets do not bridge at the bottom of the feed tube, blocking the flow. In a heated chamber, the cold end fans would be less effective, allowing heat from the hot end to flow to where the pellets are fed from the hopper. Even a slight softening of the pellets can cause them to stick to each other. This would necessitate water cooling the throat of the extruder.
3D Model & Mechanical Design
If possible, please download the model by clicking “Open in Fusion” in the 3D model viewer above. If you encounter any issues with loading, or if you prefer using a different CAD program, you are welcome to download the .F3D or .STEP files provided here . Please be aware that due to the substantial size of these files, opting for this download method contributes to higher hosting costs for this website.
There is currently no manual for putting together the printer, but the CAD model contains the location and type of each component in the assembly. Explore the model on your browser or download the file and open it with Fusion 360. The video series shows the order in which each sub assembly was put together.
BOM
Google Sheet BOMThe BOM may contain affiliate links that provide monetary kickbacks to Dr. D-Flo. These funds are used to pay for this website and future projects.
Electrical Components and Wiring
Disclaimer: Mains electricity (110 - 220 V) is dangerous both to yourself and your property. Improper technique can lead to electrocution and/or fire. Always unplug circuits and check with a multimeter to ensure a circuit is de-energized prior to begining work. Follow all electrical codes and consult with an electrician before attempting this project. The wiring diagrams and information provided are for reference only. Dr. D-Flo assumes no responsibility for your property or health if you take on this DIY project.Power Supply
With the printer’s current configuration, the extruder heating element, extruder servo amplifier, and 24 V power supply for the duet mainboard and associated electronics are powered by a 15 A 110 V circuit. The 5500 W heated bed is on an independent 220 V 30 A circuit. This setup allows users to forgo the heated bed and use mechanical restraint (brim, clamps, etc.) to hold prints onto the bed. Therefore, a normal house outlet would work for powering this printer, a benefit of this design. It is easy to modify the electronics to run off of 220V. The only substitution required is new contactors that have coils rated for 220 V. Consult the manuals for the 24 V power supply, servo motor power supply, and MDPH2 extruder to use 220V power.
The two contactors are for switching on/off the 110 V and 220 V circuits. When supplied 110 V the electromagnet inside the contactors closes the circuit. If this circuit is interrupted, then the contactors will spring open cutting all power to the printer. An emergency stop button and the thermal fuse located near the heated bed are two possible ways to open the coils’ circuits. The emergency stop button is pressed by the user when a fault is detected or the thermal fuse blows when the bed or the chamber reaches too high of a temperature (i.e., thermal runaway).
Not pictured: Panel mount disconnect switches were also used to disconnect incoming mains power.
Contactors do not protect you and the printer from a short circuit. Electrical shorts result from poor wiring or a failed electrical component (e.g., silicone bed or ceramic heaters in the extruder). Shorts can cause electric shocks if the user touches any metal component on the printer and can cause arcing, a serious fire hazard. Shorts are more likely to occur near heating elements as wire insulation and terminations are often made from plastic materials, which can soften and melt at high temperatures, revealing the bare conductor. All wire insulation and terminations should be selected for their ability to withstand the temperatures of the printer’s chamber and heated bed. If there is a potential for the wire to come in contact with the extruder’s barrel, then it must be rated for > 500C.
Proper grounding of all electrical components is necessary to shut power to the printer if a short forms. The frame, printer bed, extruder, electrical cabinet, and solenoid cabinet all require a robust connection to ground. Wire these components in a star pattern to prevent ground loops.
Your local electrical code may require additional safety features.
Direct Controller Board Wiring
The LF3DP is controlled by the Duet 3 6HC mainboard. The Duet 3 and the family of expansion boards can natively drive the high torque stepper motors required to move the massive gantry. There are also plenty of IO ports for controlling the limit switches, fans, and all the electronics required for feeding the extruder pellets.
Below is the minimum configuration for the direct wiring of the motors, sensors, and other electrical components. Two expansion boards are required in addition to the 6HC mainboard:
- 1HCL Expansion Board in order to power the 7th and final stepper motor. The mainboard only supports 6 stepper motors.
- 1XD Expansion Board to provide the step, direction, and enable signal for the Teknic ClearPath servo motor on the MDPH2 pellet extruder.
In place of the 1HCL board, the 3HC Expansion Board can be used for 3 additional stepper motor connections and 12 additional input/outputs. If you are using a pellet extruder or filament extruder that uses a stepper motor or if you need more I/O ports for additional functionality, then this board is recommended.
Duet3D’s documentation for wiring their boards is excellent and should be reviewed before starting this project:
Connections that are not illustrated:
- RGB LEDs for side light bars. See here.
- Door lock sensor to pause the machine and turn off heaters if a door is opened. This feature is often required depending on local codes.
Learn more about sinking and sourcing inputs/outputs here.
Closed-Loop Expansion Board Wiring
Please Note: Closed-loop expansion boards are part of version LF3DPβ. A Duet 6HC or 6XD mainboard and 1XD are still required. Non-linear actuator components should be connected as illustrated in the Direct Controller Board Wiring tab.
As explored in video 5, closed-loop stepper motors have positional feedback that allows for smoother motion and detection of stalled motion (e.g., a collision with a warped part). However, the Duet 3 6HC mainboard does not have connectors for the encoders that provide the positional feedback. To unlock this functionality, a Duet 3 1HCL expansion board, which interfaces with the mainboard over CAN FD, is required for each of the 7 closed-loop stepper motors.
This is an expensive upgrade, but it has the added benefit of greatly reducing the number of wires that needs to be run to each actuator because with onlu 4 wires (2 for CAN and 2 for power) 1HCL board supports:
- A stepper motor with up to 6.3A peak per phase
- An encoder
- 2x IO ports for limit switches and other auxiliary components
- 2x Medium level outputs for a motor brake and one other high current component (up to 2.5A)
- 2x Thermistor/PT1000 for motor, chamber, or extruder temperature readings
Effectively each 1HCL board can control all the components required to run one actuator. If this expansion board is placed near the actuator, then it is easy to swap components in the case of a failure.
Programming and Tuning
Each 1HCL expansion board needs to be assigned an address before connecting them all to the mainboard. See this article for more information. For the supplied configuration file to work with your setup, make sure that the CAN address for each board/axis corresponds to the following:
| Actuator* | CAN Adress |
|---|---|
| Z1 | 40 |
| Z2 | 41 |
| Z3 | 42 |
| Z4 | 43 |
| Y1 | 44 |
| Y2 | 45 |
| Y2 | 46 |
For tuning the motors see this guide.
Z-Axis Brakes
Due to the weight of the gantry and the low detent torque of the Z-axis NEMA 23 steppers (1 Kg-cm or 13.9 oz-in), the printer will lose squareness when the motors lose power. Therefore, quad gantry leveling will have to be run at startup. If power is lost during the middle of a print, then it will not be possible to resume it because the bed must be clear for the leveling procedure. Upgrading the Z-axis actuators to stepper motors with brakes will prevent the gantry from sagging as a strong electromagnetic brake will hold each Z-axis carriage in place. P Series Nema 23 Stepper Motor 2Nm/283.28oz.in from StepperOnline were used for the Z actuators. It is critical the brakes are disengaged at startup to prevent damage to printer when the motors are commanded to move.
Extruders
Note: For detailed information on screw and filament extruders, please see their respective articles on this website.
It should be evident that a normal filament extruder will not suffice for this large of a print volume. Even the E3D SuperVolcano with its max 92 mm3 flow rate (~400g of PLA per hour) would struggle to print large objects in a timely manner. Fundamentally, filament extruders will always be limited by conductive heating as the hotend must heat the filament from the outside in. Further, plastics are insulators, so conductive heating is slow. There are only two practical ways to increase melt flow rate in a filament extruder: 1) a larger hotend that provides more surface area to conduct heat across (E3D V6 vs. Volcano vs. SuperVolcano) or 2) a higher hotend temperature to create a larger thermal gradient. Both approaches have their drawbacks. Namely, for the first, the longer the hotend the slower retraction is, which can lead to drool and stringing. And increasing the extruder temperature too high can result in degradation of the filament.
The Filament Extruder to Rule Them All
Dyze acutely understood these scaling issues with filament extrusion when they designed their Typhoon extruder capable of melting 0.9 kg/hr. This massive volumetric flow rate is from a combination of a long 125 mm hotend (2.5x longer than the SuperVolcano) and an industrial extrusion drive that can generate enough force to push out 125 meters of filament per hour. In order to prevent the filament from buckling under high compressive loads, Dyze had to opt for the larger 2.85 mm filament standard versus the more common and cheaper 1.75 mm.
The Dyze Typhoon was an option I considered seriously because of its high melting capacity. However, I decided against using filament as the feedstock for a few key reasons. First, at the maximum flow rate, I'd have to replace a 10 kg spool every 10 hours, which is too frequent for multi-day prints. Second, the cost of 10 kg spools adds up quickly, and they can cost several hundred dollars each. But for those looking for an upscaled version of a typical hobbyist filament extruder, the Typhoon might still be the best choice. It promises quicker startups and an operation similar to smaller machines, and it does allow for filament retraction to mitigate stringing when moving across open spaces.
Screw Extrusion
As explained in detail on my screw extrusion guide and recent YouTube video, screw extruders use a screw to convey pellets (instead of filament) from a hopper to a die or nozzle. The screw has a special taper that compresses the pellets, which causes the solid material to melt through friction and viscous heating. This heating mechanism allows the plastic to be heated from within, largely circumventing the conductive heating problem of filament extruders. This method of efficient heating and mixing is why screw extruders are at the heart of nearly every manufacturing process that produces plastic items.
The reason that screw extruders are not commonly found on hobbyist printers is due to the large motors required to turn the screw and generate the friction needed to heat the material. Additionally, the screw needs to have a sufficient number of flights to ensure the plastic pellets have enough time to melt thoroughly. This results in a rather heavy and bulky setup that’s not suitable for most desktop 3D printers, which are designed to be more compact and accessible. While there have been efforts to scale down the size of extruders (for example, the Pulsar Atom), such reductions often compromise their effectiveness. In my view, a small pellet extruder contradicts itself by forgoing its primary advantage of having a long screw that ensures consistent melting of the material.
The large format 3D printer was designed to produce structural objects that emphasize large extrusion widths over intricate detailing. In alignment with this design philosophy, the LF3DPα and LF3DPγ models employ lead screw and rack and pinion drive systems, respectively. These robust actuators are well-suited for the demands of a pellet extruder, which is significantly heavier than filament-based systems. I initially installed the MDPH2 extruder, capable of a respectable 1 kg/hr output. However, to further push the boundaries of what my printer could achieve, I transitioned to the MDPE10. This newer extruder is bulkier but boasts a screw length that's 2.5 times longer, providing a fivefold increase in volumetric output to 5.5 kg/hr. The higher flow rate vastly improved print speed, and the extended screw length facilitates more thorough mixing of colorant, yielding a more uniform and aesthetically pleasing color distribution in the final print.
Pellet Conveyance
With filament 3D printers, the continuous extrusion of plastic is largely taken for granted. Pellet extruders, on the other hand, are more prone to material feeding issues as they are fed by discrete pellets and not continuous filament. While infrequent, pellets can fall into an orientation where they bridge across the diameter of the feed tube, blocking the flow of material behind them. Even a short interruption in the pellet flow will result in gaps between printed layers. Of course, a permanent block will cause a print failure. Print failures on this scale are quite frustrating as they generate a lot of wasted material and are costly. Consequently, any system that keeps the pellets flowing is worth investing in at this scale.
There are methods for both detecting blockages and clearing bridged pellets, both of which are sold by Massive Dimension. A pressure transducer addon can detect a change in pressure, such as when material is not flowing into the barrel. This addon is quite expensive (~$6k) but is worth the cost because the printer can be paused in response to a pressure drop, and the jam can be cleared manually.
Pellet Vibrators
99% of all bridged pellets can be cleared by applying target vibrations to the throat of the extruder. Vibrations increase the fluidity of plastic pellets, allowing them to change orientations for continuous feeding. Massive dimensions sells a pneumatic vibrator called the Feedstock Agitator that is compatible out-of-the-box with the MDPH2 and MDPE10 extruders. In video 5, a custom feedstock agitator was built as a more cost-effective solution that can be integrated directly with LF3DP’s controller board. Electrical connections are illustrated above, and pneumatics are below. The vibrator does not need to run continuously. Instead a duty cycle of 5 seconds on with 1 minute off is sufficient.
Please note: Throat adapters were designed ( STL files here) to support both the CVT-P-1 turbine vibrator and the VM-38 linear piston vibrator manufactured by the Cleveland Vibrator Company. While the CVT-P-1 was featured in video 5, there was an issue with the bearings and had to be returned after several hundred hours of operation. Linear vibrators are more robust, but they should be mounted perpendicular to the target of the vibrations. However, there was not enough space inside of the MDPH2 housing for this arrangement, but enough pellet movement was observed when mounting the vibrator parallel to the throat. The turbine vibrator is the better design because the produced vibrations are omnidirectional but is more expensive, and my unit had a bearing issue.
Pellet Conveyance from Bulk Material Storage
Due to weight restrictions, only a small volume of pellets is stored on the printhead for immediate use. Once these pellets are exhausted, material from the pellet bin needs to be transported to the printhead. There were quite a few recommendations in the comment section of video 4 for ways to move pellets both mechanically (e.g., Archimedes screw) and pneumatically (e.g. Venturi vacuum). But the simplicity of a Venturi system is best suited for large format 3D printing. The only requirements are a source of compressed air, a solenoid to control the flow of air, a Venturi vacuum generator, and a tube to carry the pellets. Outside of the solenoid opening and closing, there are no moving parts.
The Material Conveyance Unit sold by Massive Dimension is a stand-alone Venturi vacuum system. When the capacitive sensor on the print head detects more pellets are needed, it directly triggers the solenoid, and the pellets are sucked out of the pellet bin and flow to the printhead. Once pellets have been replenished the capacitive sensor switches off the solenoid. In a perfect world, this setup would function as intended, but if the pellet tube ever becomes disconnected from the print head or the pellet bin runs out of pellets then the conveyance unit will remain on indefinitely with the first scenario causing all pellets stored in the bin to be thrown throughout the room. The mess that this can cause was seen at the end of video 4.
What is missing is a watchdog timer that turns off the solenoid if the printhead fails to fill in a set amount of time. For this reason, the capacitor sensor and solenoid were wired to the LF3DP’s controller board to carefully monitor the flow of pellets. If the bin runs out or the pellet tube becomes dislodged, then the controller board will turn off the pellet conveyance system and pause the printer.
The material reservoir that comes with the Material Conveyance Unit features a right-angle connection for the incoming pellet tube that is ideal for motion setups involving a robotic arm but not gantry systems such as this printer. Included in the available files is a material reservoir with a vertical connection, which was designed to be SLS printed. With the vertical connection, the pellet tube is not likely to fall off.
Pneumatic Components and Circuit
There are two pneumatic devices that need an intermittent supply of clean, dry air: the Venturi vacuum generator and the vibrator. The Venturi vacuum is rated for 50 CFM at 90 PSI, which is a tremendous amount of air for a hobbyist operation. Fortunately, the pellet conveyance system only takes < 2 seconds to refill the printhead. A 2 hp air compressor with at least a 10 gallon tank, such as the California Air tools 10020C, is sufficient for supplying air and only requires a common 15A 110V circuit. However, if the vibrator is set to run at a higher duty cycle than ~8% (5 seconds on and 60 seconds off), then a larger air compressor may be required.
The air supplied to the Venturi pellet conveyance system must be bone-dry because moisture can greatly affect the extrusion process by increasing unwanted oozing or even degrading the plastic (e.g., PLA hydrolytically degrades at high temperatures). If you see pockets/bubbles forming in the extruded plastic then either the pellets, air supply, or both are contaminated with water. Pellets should be dried according to the manufacturer’s specifications and an air dryer should be installed after the compressor. In humid Tennessee, three air dryers were tested with the LF3DP:
| Product Name: | Manufacturer | Desiccant Volume | Desiccant/Filter Maintenance (Total Print Time)* | Cost |
|---|---|---|---|---|
| M-60 NPT Sub-Micronic Filter** | Motor Guard | N/A (Filter) | ~48 hrs | $82 |
| Air Cleaner/Dryer (PA208503AV) | Campbell Hausfeld | 0.1 L | ~24 hrs | $99 |
| Max Dry | USA Weld | 2L | ~500 hrs | $450 |
** With the Motor Guard filter it is difficult to determine when to replace the filter as there is no colometric readout. Desiccant-based air dryers are preferred for this reason.
While the Venturi vacuum system works best at 90 PSI (0.6 MPa), the vibrator can run efficiently from 20 to 80 PSI (0.14 to 0.55 MPa). The vibrator should be supplied with the lowest pressure that still provides enough vibrations to prevent the pellets from bridging. Using a lower pressure will increase the lifespan of the vibrator, but it will take trial and error to determine the minimum pressure required.
The lifespan of linear piston vibrators (but not turbine-variants) can also be increased by powering them with lubricated air. Inside of a linear piston vibrator is a weighted slug that bounces back and forth. Without lubrication the channel and the slug will both wear down allowing for more air to pass by without driving the slug, resulting in less vibrations. An inline lubricator can be installed after the regulator, but an oil separator on the other side of the vibrator is required to keep oil from contaminating the bed and the print. Plastic does not adhere to oil covered surfaces.
Pellets and Recycled Material
While pellet extruders and supporting pellet conveyance systems have high upfront costs, significant cost savings can be had when buying pellets compared to filament. Spools of filament are commonly sold in 1, 2, 4, or 10 kg quantities. However, when purchasing larger spools not only can you run into compatibility issues with your 3D printer, but also, the cost savings are not nearly what you would expect. For example, 3DXTech sells their Ecomax PLA in 1 kg and 4 kg spools for $32 and $110, respectively. The larger spool saves you $18 or about 0.5 kg of filament, which is better than no savings, but 3DXTech will also sell you 10 kg of PLA pellets for $100. This example highlights two findings: 1.) plastic pellets are very cheap and 2.) the process of re-extruding the pellets as a filament contributes greatly to the ultimate cost of a spool.
When purchasing pellets in even larger quantities, such as a 1250 kg Supersack from Filabot, PLA pellets will cost $6 or less per kg. If you plan on incorporating large format 3D printing in your business, then be sure to budget the equipment that can unload, move, and dry these large quantities of pellets. Large quantities of pellets can be dried with Massive Dimension’s Plastic Pellet dryer.
The LF3DP is compatible with thermoplastics that have a lower melting point than the 450℃ max extrusion temperature of the MDPH2. However, as discussed in video 5, some plastics such as ABS emit noxious volatile organic compounds (VOCs) and require industrial exhaust systems to print safely. Additional plastics, such as ABS, ASA, PC, PPS, PEI and PEEK, that are dimensionally unstable and must be printed in a heated chamber are also poor candidates for the current configuration of this printer. Insulation and active chamber heating can be added to the LF3DP to support these resins, but these upgrades will require changes to frame and will significantly increase the power draw.
The current design is most suitable for printing:
- PLA
- PETG
Pellet Production and Shape
Polymerization reactors, which create plastics, often output their thermoplastic resins as powder or small granules. However, the final plastic often contains more than just the base resin, but may also contain any of the following: fillers, reinforcements, colorants, stabilizers, antioxidants, ultraviolet light absorbers, plasticizers, and many other types of additives for improved material performance or special applications. To mix these additives with the resin, a screw extruder (e.g., compounder or twin-screw extruder) melts and mixes the components together. The extruder outputs a continuous fiber that is chopped into pellets. The method of chopping or pelletizing determines the shape of the pellets.
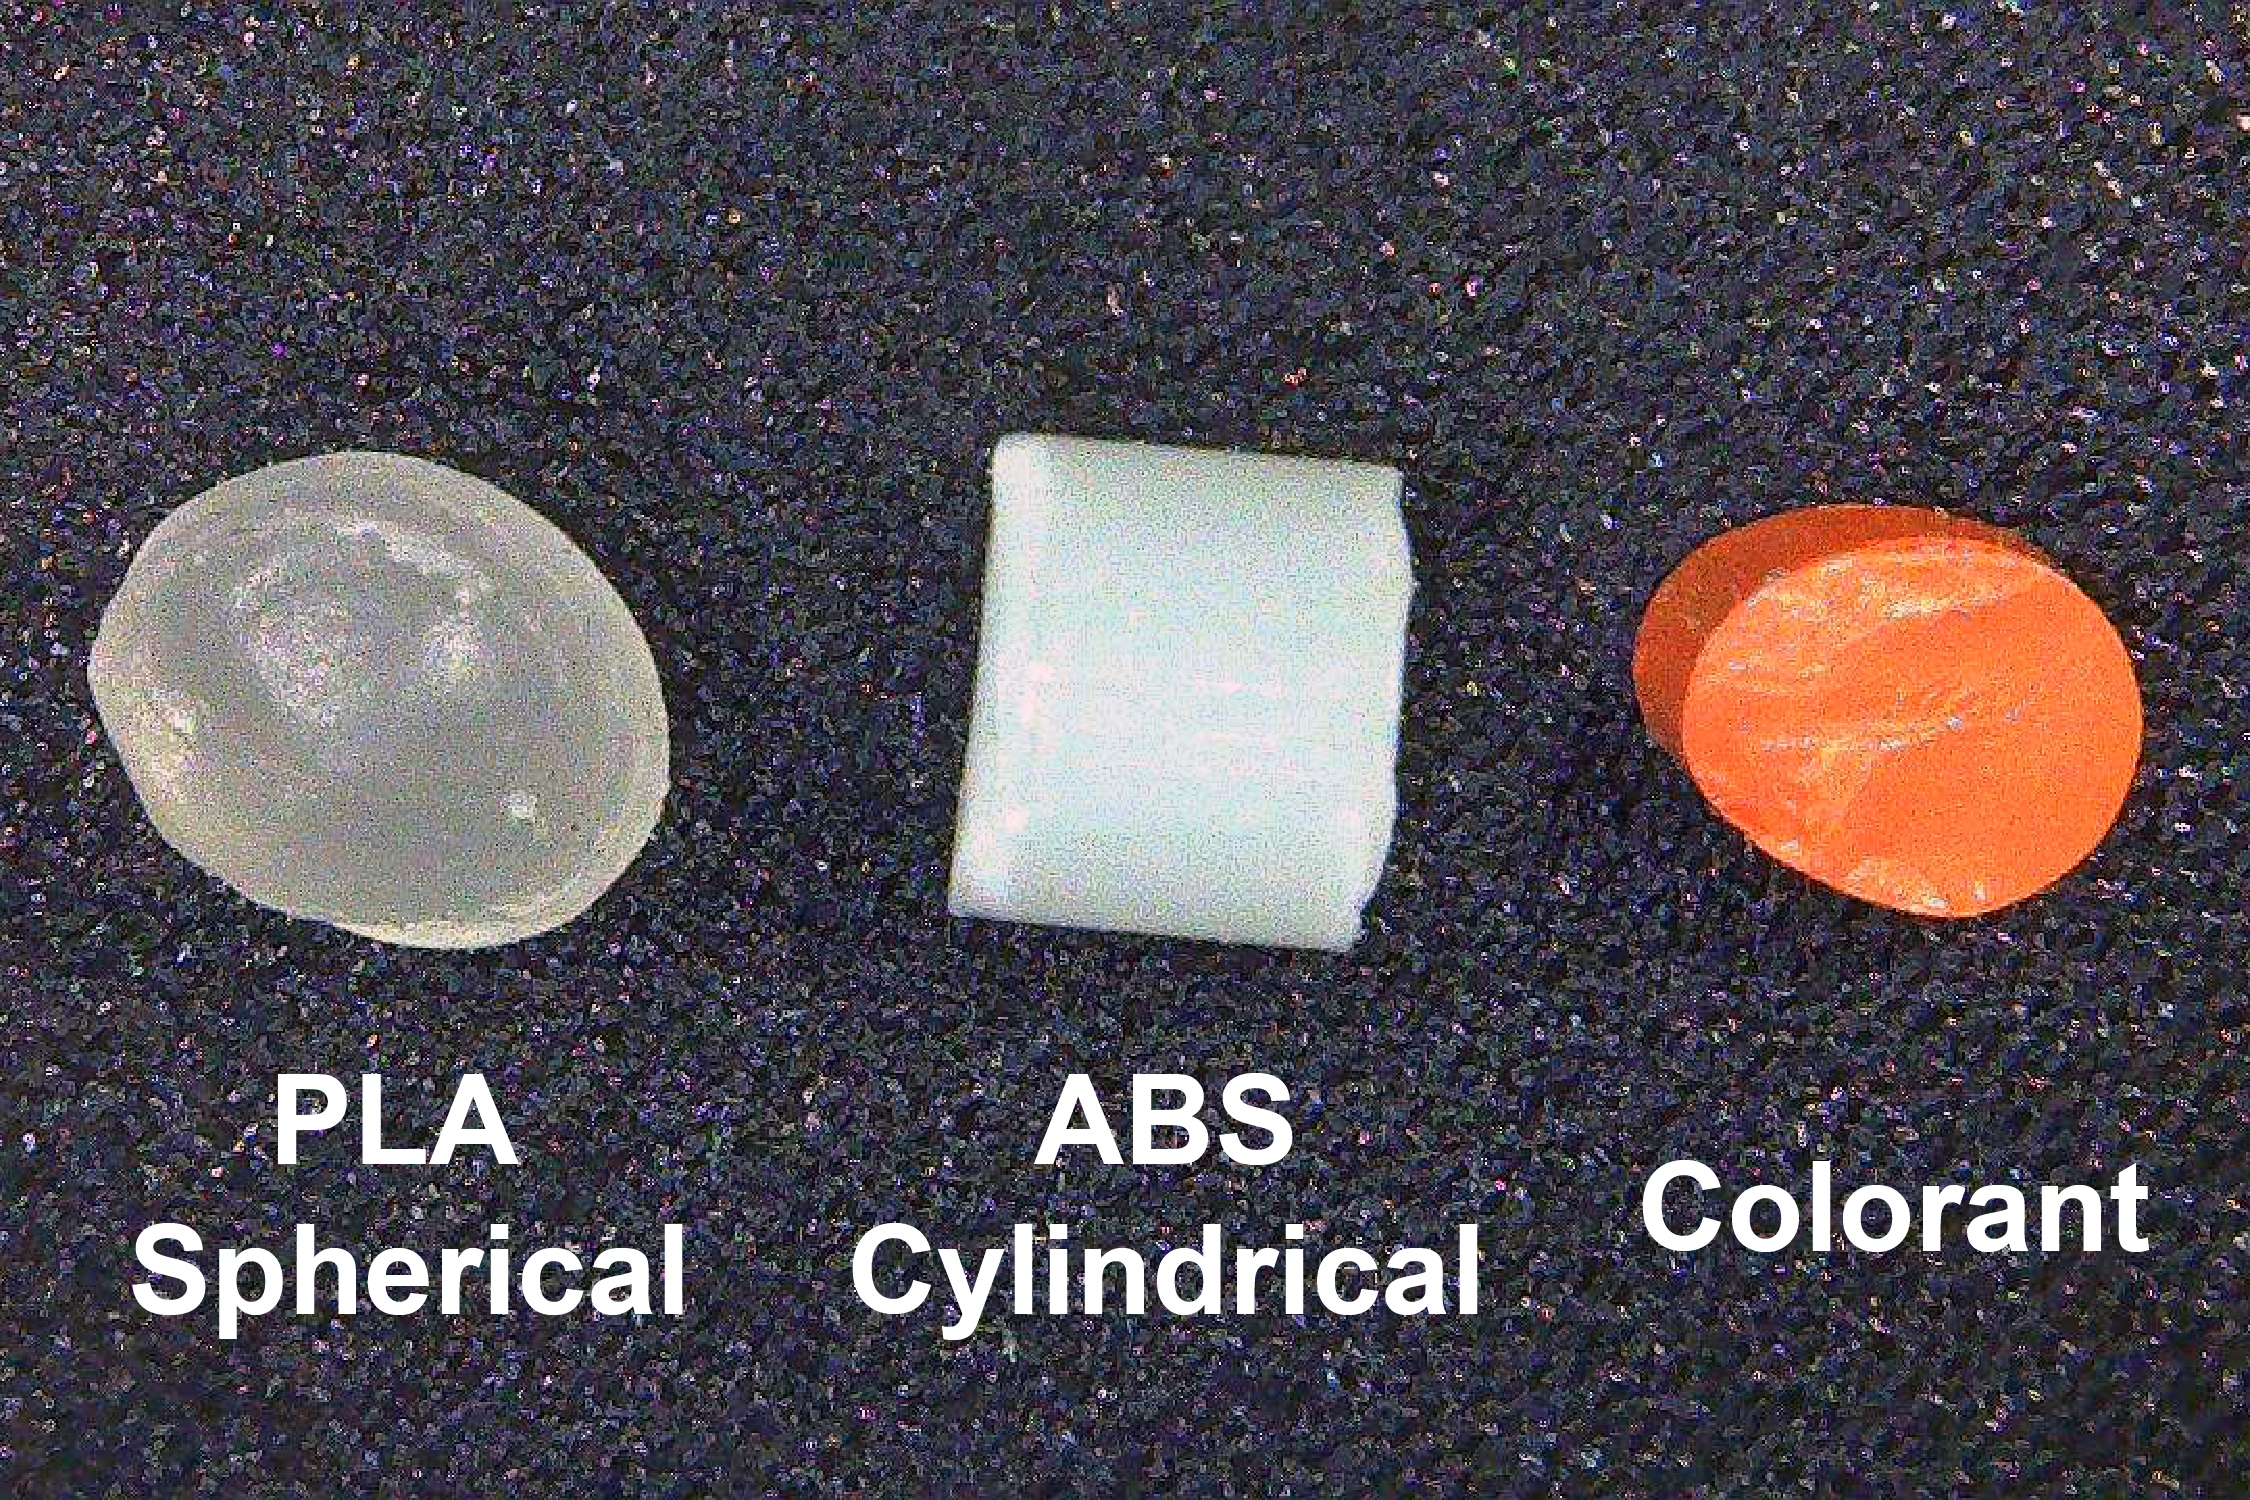
Strand pelletizers use a rotating cutter that chops the pellets immediately after they exit the die or after the extruded fiber has been cooled. Strand pelletizing results in cylindrical shaped pellets. In the second method, underwater pelletizing, material exits from the extruder into a water chamber where it is immediately sheared into pellets by a cutter. Because of forces that minimize surface tension, each piece of molten material cools into a spherical shape. Compared to the cylindrical pellets, spherical pellets are more uniform in size and their geometry enhances their flow into feed throats. Therefore, spherical pellets should always be sought for large format printing.
Colorant
The natural color of most plastics pellets is a translucent, milky-white, which is not appealing when trying to print art, furniture, or other visually engaging objects. It is possible to purchase colored-pellets, but for each color a large volume of material will need to be stored and segregated. A better approach is to mix in a small amount of a highly concentrated pigment, known as colorant, with the bulk material needed to complete a print. The screw extruder will melt and mix both the colorant and base material to produce a colored extrudate. The color tones can be changed by easily adjusting the amount of colorant mixed into the base material. To produce a vivid color, often only 1 colorant pellet per 100 base material pellets is required. Therefore, several kilograms/pounds of colorants could dye large volumes of PLA, ABS, etc.
To create a colorant, a dye or pigment, such as carbon block, titanium dioxide, or an azo-type, is mixed with a carrier resin. The carrier resin is what allows the colorant to be formed into a pellet shape that can be mixed easily with the base pellets without concerns of separating out during storage. The ideal carrier resin would be the base material that is being printed with, but this approach would limit the compatibility of each colorant. For example, a colorant with an ABS carrier resin would be unsuitable for PLA pellets due to the different thermal processing requirements. To prevent manufacturers from having to store many different colorants, so-called “universal carriers” have been created that can be mixed with many different base materials. While marketed as universal, it should be noted that the introduction of a different resin will negatively affect the chemical and physical properties of the base material. The amount of universal colorant should always be minimized.
Colorants for pellet extrusion can be sourced from McMaster-Carr. Pay careful attention to the colorant’s compatibility. Due to PLA’s somewhat limited applications of 3D printing and biomaterials, few masterbatch (e.g., colorant) manufacturers specify compatibility with PLA. However, colorants that are compatible with other polyesters (e.g, PET) are likely to work with PLA. At the time writing, colorants on McMaster-Carr are supplied by the RTP company. It is best to reach out to them with your application to properly select a masterbatch.
Recycling Plastics with Large Format 3D Printing
Many see Large Format 3D Printing as one possible avenue for breathing a second life into recyclable plastics. Old soda bottles can be crushed up and printed into park benches or even art installations. While there are startups that have demonstrated the feasibility of this idea, it is important not to overlook the technical challenges of printing old plastics. Perhaps the most pressing issue is sourcing a stream of recycled material that is:
- Pure – composed of nearly 100% of a single type of printable plastic.
- Uniform size – material must be of similar size and density to plastic pellets (~3-4 mm in diameter) to be processed by a pellet extruder.
- Not Degraded – material exposed to the sun and/or wet and warm climates will have deteriorated mechanical properties. Virgin material is often combined with recycled material to preserve desirable properties.
These requirements can be met by sophisticated sorting and crushing machines or even by manpower alone, but both of these approaches are costly. As discussed above, new plastic pellets are cheap, which is why recycled products cost as much if not more than those made from new materials. Changes in public policy and new technologies are desperately needed to improve the value proposition of recycling commodity plastics for 3D printing.
However, there is one readily available source of recycled material that meets all three criteria: failed prints on both small filament and large format 3D printers. Assuming a single extruder, these failed prints are composed of one material and have a known thermal and chemical history. These parts can be granulated by a machine, such as the Filabot Reclaimer, and reprinted with the pellet extruder on the LF3DP. Nearly all prints on Dr. D-Flo’s LF3DP contain previously printed plastics, which helps lower the cost per kg of a massive print by even more!
Check out Dr. D-Flo's video on recycling plastics to learn more about the benefits and limations of this process.
Purchase the LF3DP or Components
Dr. D-Flo is excited to announce the sale of both turnkey LF3DP machines and individual components for DIY assembly.
Prices are listed on the BOM. To log your interest and to receive priority in purchasing the limited stock of components please email Dr. D-Flo (David) at [email protected]
Open-Source Content
Dr. D-Flo’s #1 priority is ensuring uninterrupted access to his digital fabrication content for everyone. Information and project files are free without any intrusive advertisements. The goal of this website and YouTube channel is to inspire more makers, DIYers, machinists, fabricators, and engineers as we need physical solutions for many of the problems facing our society.
If you find yourself in a position to contribute, we would greatly appreciate your support through becoming a YouTube channel member, a one-time donation, or purchasing your tools through Dr. D-Flo’s Amazon store.
Discussion and Feedback
Do you need more help? The best way to get your questions answered by Dr. D-Flo and other DIYers is to post a question on the forum. Click here for the forum topic specific to this project.
Rate this Project: or
Did you encounter broken links or misinformation while reading this article? Please bring these issues to our attention by providing your feedback below.