Overview
The firmware is the software that runs on the 3D printer’s microcontroller. Its purpose is to translate the contents of a G-code file into electrical signals that activate or deactivate 3D printer components. Briefly, the G-code file is a list of commands and coordinates that describes the 3D model to be printed. The G-code is generated on a computer by a program known as a slicer based on the desired 3D model. The ins and outs of this process are discussed in a separate section (see: Slicers). But back to talking about G-code. 99% of the G-code is made up coordinates that look something like the following:
G1 X50 Y20 E15
We can dissect this code by looking up the G-code commands. G1 instructs the microcontroller to prepare for a linear movement. Then the new coordinates, which are X = 50, Y = 20, and E = 15, are read in by the firmware. For 3D printers, the E stands for the extrusion drive. When an E is present in a G code coordinate then either filament is being deposited or retracted. At this point the firmware needs to perform some basic calculations to determine how far off each carriage is from the required positions. After determining directions and distances the microcontroller will send step pulses to the stepper drivers, which will move the appropriate stepper motors.
The above sequence of events relies on the assumption that the firmware understands the setup of the 3D printer that it is controlling. A printer motherboard can be used in a variety of different 3D printer builds or even non-3D printer builds, like laser cutters and CNC routers. Therefore, it is critical that the firmware understands the exact configuration of the 3D printer down to the transmission specifications for each axis and extrusion drive(s).
Configuration Variables
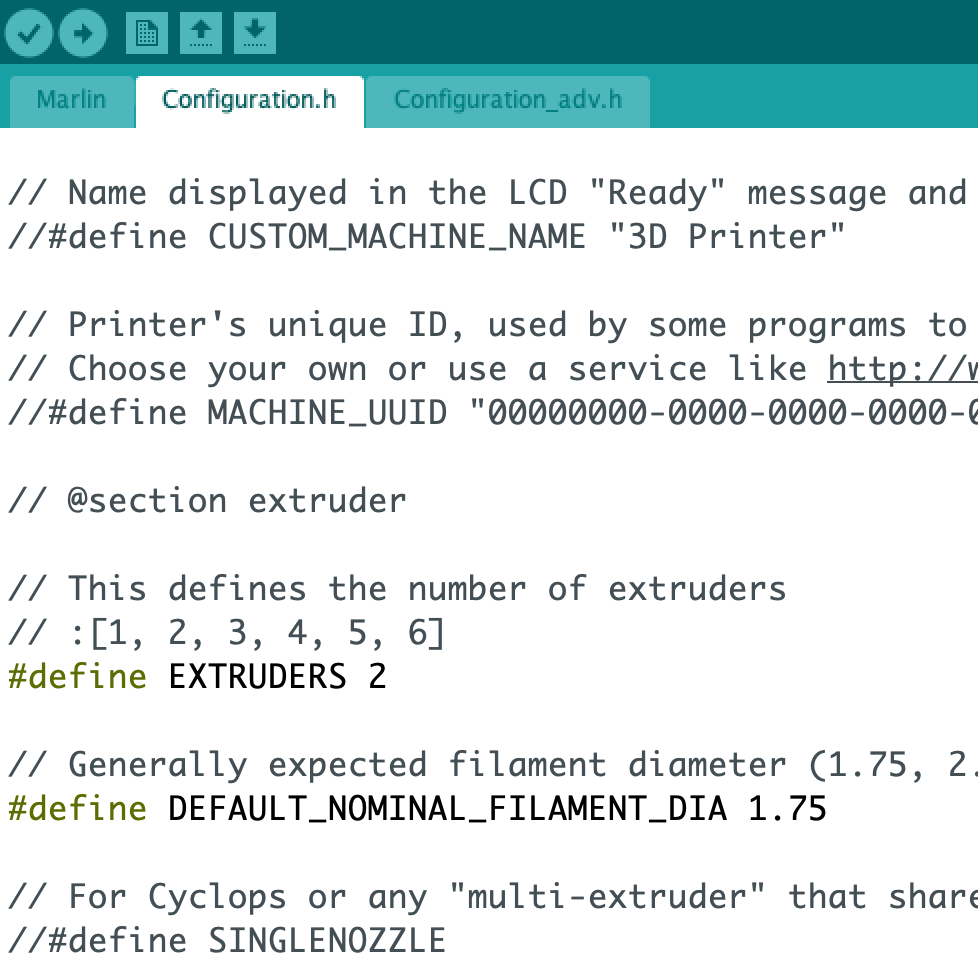
The appropriately named configuration variables are where your printer’s specific information is stored. These variables are typically located in an accessible file known as a configuration file. Way back in the day you had to understand C/C++ in order to program a custom 3D printer. Today, that is certainly not the case and very little if any coding experience is needed to setup up the firmware. Prior to looking up the configuration variables, it’s a great exercise to brainstorm what these variables might be. Imagine that you are the microcontroller for a 3D printer, and you have a long list of G-code that you need to turn into a physical 3D object. What information do you need to be stored in the firmware to make that happen? Yes, this is a little dorky, but this exercise will demystify the configuration variables. Take a look at my list below and compare it to what you came up with.
- Number of extruders – How many extruders does the 3D printer have?
- Heated bed – Is there a heated bed?
- Location of limit switches – Are the limit switches at the minimum or maximum of their respective linear guides?
- Z probe – Is there a Z-probe? If not, then how far away is the extruder from the build plate?
- Stepper motor rotation to linear motion – For each axis, how far does the carriage move per rotation of the stepper motor?
- Build Volume – What is the maximum travel for each axis?
- Direction – Does clockwise or counterclockwise rotation of each stepper motor result in positive movement?
- Filament extrusion – How much filament is extruded per rotation of the extrusion drive stepper?
- Speed – What is the maximum speed each motor is capable of?
This list contains more the intuitive features that need to be defined by the configuration file, but it is still incomplete. Nevertheless, I hope you can appreciate how important the configuration variables are and why there are so many of them. Before I give an example of a configuration variable, it’s important to mention that there are different types of firmwares, similar to how there are different computer operating systems (e.g. macOS, windows, linux). Across firmwares, these configurations variables may have slightly different names, inputs, and locations. We will continue our discussion about the different types of firmwares below. To keep things simple, I will be using RepRapFirmware for this example. Arguably, one of the most important configuration variables is the step pulse to linear distance conversion, which is bullet point #5 on my list above. The microcontroller sends step pulses to the drivers in order to move the motors. For the microcontroller to properly move the carriages to new coordinates it must know precisely how far the carriages move per pulse that it sends. This step pulse per some distance will be depend on how the transmission is setup (e.g. 20T pulley vs. 16T pulley vs. lead screw), and therefore each axis, including the extrusion drive, could have a different step pulse to linear distance conversion. The following is a snipet of code used in RepRapFirmware to set these step pulse to linear distances variables for each axis and extrusion drive:
M92 X80 Y80 Z1200 E410
The M92 command tells the RepRapFirmware to set how many step pulses it takes to cover 1 mm of linear distance for the following axes. In this example, the X and Y carriages move 1 mm every 80 step pulses while the Z axis moves 1 mm every 1200 pulses. Clearly, there is a quite a range of possible step pulses per mm. If you were curious the 3D printer that has these specific steps per mm has pulley driven X and Y axes and a lead screw driven Z axis. Inputting the wrong steps per mm will result in prints with dimensional inaccuracies because the microcontroller would think that it is covering some distance but in reality it is not. The E parameter once again refers to the extruder. Here it takes 410 step pulses to extrude 1mm filament.
This was just a short introduction into configuration variables and why they are important. Check the external resources below for guides specific to setting up the configuration file for the firmware that your microcontroller is running.
Available Firmwares
When you purchase a motherboard you are buying into not only the hardware but also a firmware. In some rare cases, it is possible to switch a motherboard/microcontroller to a different type of firmware, but usually firmwares are designed to run on a small family of boards that share a similar layout and microcontroller. In my experience, the firmware is a software that you setup once and forget. For this reason, if you purchase a used printer motherboard, then it’s probably a good idea to check for firmware updates online to make sure that your firmware matches the current available documentation because it is unlikely that the previous owner installed any updates.
To be upfront, I only have experience with three firmwares: Marlin, Smoothie, and RepRapFirmware. However, many of the other firmwares are modified versions of Marlin. Not too far in the past, all the cheap motherboards with 8-bit microcontrollers ran Marlin while the more expensive 32-bit processors ran either Smoothie or RepRapfirmware. If you wanted the silky smooth prints and rich features offered by 32-bit processors, then you had to swallow the cost of a premium Duet Wifi (RepRapfirmware) or Smoothieboard. Today, Marlin 2.0 exists which can run on boards with a 32-bit ARM processor. This allows DIYers to use the Panucatt Re-ARM controller (an Arduino Mega replacement) with a RAMPs to form a 32-bit motherboard that costs less than half the price of the Duet Wifi and Smoothieboard.
There are often debates on Reddit and other internet forums about which firmware is the best. I will inject my opinion into this debate in a second, but first I will provide a little background on the firmwares that I have experience with. For the longest time the only firmware that I used was Marlin. Marlin is the least intuitive of the firmwares, but the degree of customization that Marlin offered made it worth the extra time needed to properly set it up. My 3D Food Printer and 3D Printed 3D Printer projects both ran off of Marlin. These projects could have been accomplished with different motherboards and firmwares, but the Arduino + RAMPs motherboard that I used to run Marlin was dirt cheap. During those projects I was in college, so money was definitely worth more than my time.
My experience with Smoothie is limited to a summer job of managing a small printer farm with most of the printers running Smoothie. At the time, Smoothie was great option for getting into the 32-bit microcontrollers, but today it appears to be less supported than other firmwares, and people are actively converting their smoothieboards to run Marlin 2.0.
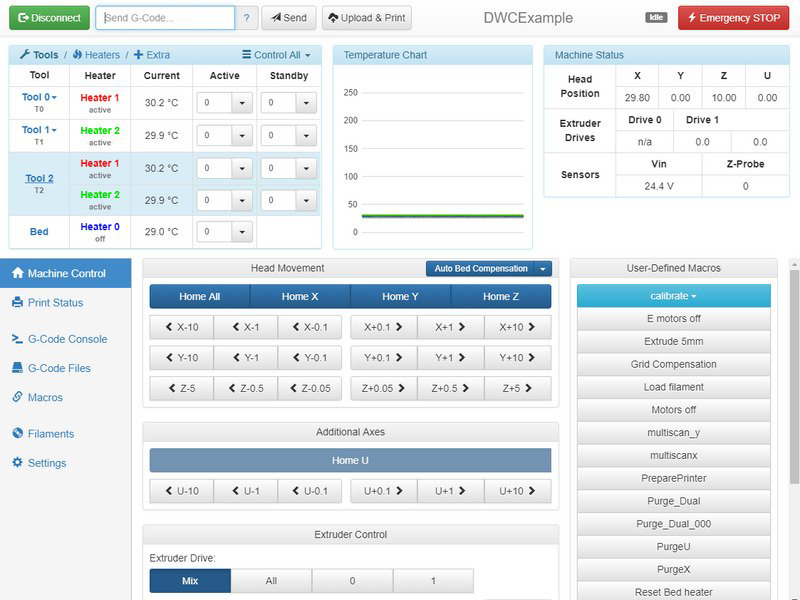
I was introduced to RepRapFirmware while I was working on Zidex, a 3D printer with dual independent extruders. In this build, I was “forced” to use the Duet Wifi because of how many stepper drivers were required to control the five axes and two extrusion drives. The $200+ that I spent on the Duet Wifi and Duet expansion board seemed outrageous even with the fancy TMC2660 stepper drivers. However, after booting up the board for the first time I realized what a treat the RepRapFirmware was to interact with. Setting up the firmware was near instantaneous with the ability to change configuration files directly within the web app hosted by the Duet. When building a printer as complex as Zidex, it was a godsend to be able to quickly tweak the configuration file as well as macros. I honestly think that I would have gone insane if I had to scroll through Marlin’s configuration file and then rebuild the entire firmware everytime I needed to make a small change to Zidex.
So here is my input on the debate of the best Firmware: If you are designing and building a unique 3D printer and have the cash, then I strongly recommend RepRapFirmware. The time and frustration that will be saved is immeasurable. But if you are building a 3D printer design that is published online that has a configuration file for Marlin available for download then it makes sense to save the money here with the cheap motherboards.
To end this section, I wanted to talk about an emerging firmware known as Klipper, which takes a different approach to G-code processing. I have not had any experience with Klipper, so all my information comes from the external resources linked below. But from my understanding, instead of the 3D Printer’s microcontroller performing the kinematics algorithms, which are computationally intensive calculations for the motion of the extruder, these calculations are offloaded to a host computer like a Raspberry Pi. The Raspberry Pi can then perform even more advanced motion calculations allowing for quicker and better quality prints. It’s a really unique approach that I hope to look into on a future printer build.
External Resources
There are a lot of different ways to successfully build a 3D printer, many of which are not covered on this website. If you want to learn more about firmwares, then click through some of the links below to external websites and forums.